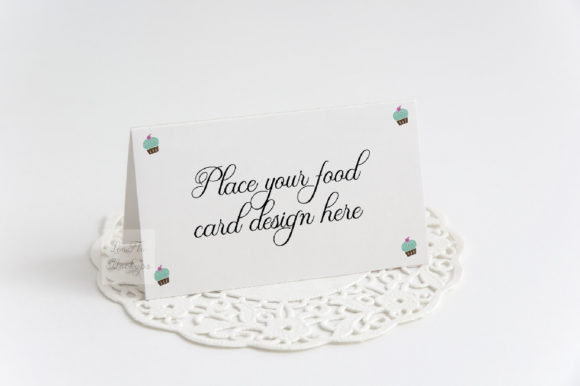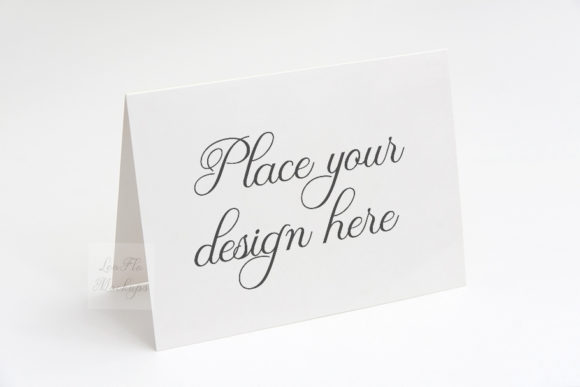
Horizontal Greeting Card Mockup: A Practical Guide to Avoiding Common Pitfalls
The horizontal greeting card mockup has become a popular tool for designers, marketers, and content creators looking to present their ideas in a clean, professional, and visually appealing format. This neutral minimal design offers a versatile canvas that can be adapted for birthdays, weddings, announcements, or any special occasion. With its 5.5 x 4.25 inch size, it’s ideal for both digital and print use, making it a go-to choice for those who want to showcase their creativity without the hassle of designing from scratch.
Why Choose a Horizontal Greeting Card Mockup?
A horizontal greeting card mockup provides a realistic preview of how your design will look when printed or displayed online. It allows you to experiment with typography, images, and layout before finalizing your work. Whether you're creating a birthday invitation, a wedding announcement, or a promotional message, this mockup helps ensure your design stands out while maintaining a cohesive and elegant look.
One of the key advantages of using a horizontal greeting card mockup is its adaptability. You can place modern illustrations, vintage sketches, quotes, monograms, or even personal photos on the front. The design is flexible enough to suit various styles, whether you prefer a minimalist aesthetic or something more elaborate.
Common Mistakes to Avoid When Using a Horizontal Greeting Card Mockup
While the horizontal greeting card mockup is a powerful tool, there are several common mistakes users make that can impact the quality and effectiveness of their designs. Being aware of these pitfalls can help you avoid unnecessary frustration and wasted effort.
- Ignoring the file structure: Many users overlook the importance of understanding the file structure before opening the PSD. The card and background are on the same layer, which means you cannot move or edit individual elements. This can lead to confusion if you’re not familiar with how the layers are organized.
- Assuming all elements are editable: Since the image is a real photo scene, some objects may not be editable. This includes the card itself, background, and any pre-placed elements. If you need to customize specific parts, you’ll need to adjust your design accordingly.
- Not reading the help file: The help file included with the download contains essential instructions. Failing to read it can result in misusing the template, leading to unsatisfactory results or wasted time trying to fix issues that could have been avoided.
- Using low-resolution images: While the final output is high-resolution (300 dpi), using low-quality images or text can reduce the overall impact of your design. Always ensure your content is crisp and clear to maintain professionalism.
- Overlooking the dimensions: The mockup is designed for a specific size—5.5 x 4.25 inches. If you scale your design incorrectly, it may not fit well on the card or appear distorted when printed or displayed online.
How These Mistakes Can Affect Your Work
Making these errors can lead to several negative outcomes. For instance, not understanding the file structure or assuming elements are editable can result in a design that doesn’t look as intended. This might cause dissatisfaction with the final product and require additional time to correct.
Similarly, using low-resolution images or incorrect dimensions can compromise the quality of your design. In a professional setting, such as a marketing campaign or a client presentation, poor quality can damage your credibility and reduce the effectiveness of your message.
Moreover, not following the provided help file can lead to confusion and frustration, especially for beginners. It’s crucial to take the time to understand how the mockup works before starting your project.
Practical Tips for Success
To ensure a smooth and successful experience with your horizontal greeting card mockup, consider the following tips:
- Read the help file carefully: Before opening the PSD, take the time to review the instructions. Understanding the file structure and limitations will save you time and prevent unnecessary complications.
- Use high-quality content: Ensure that any images, text, or graphics you add are of high resolution. This will help maintain the clarity and professionalism of your design.
- Plan your layout in advance: Sketch or outline your design before placing anything on the mockup. This helps you visualize how everything will fit together and avoids last-minute changes.
- Test different styles: Experiment with various design elements to find what works best for your message. Whether you go for a modern or vintage look, the mockup gives you the flexibility to try out different approaches.
- Check the final output: Always preview your design on different devices and screen sizes to ensure it looks good in all contexts. This is especially important if you plan to use it on social media or a website.
What to Check Before Using Your Horizontal Greeting Card Mockup
Before diving into your design, take a moment to verify a few key points:
- Are the files complete? Make sure you’ve received all the necessary files, including the hi-res JPG and the Smart Object PSD. Missing files can disrupt your workflow.
- Is the resolution sufficient? Confirm that the final output meets your requirements, especially if you plan to print the design.
- Can you edit the elements as needed? Understand which parts of the mockup are editable and which are fixed. This will help you avoid frustration during the design process.
- Does the mockup match your brand or message? Ensure the style and tone of the mockup align with your overall branding or the purpose of your design.
- Have you followed the instructions? Double-check that you’ve read and understood the help file. This will help you navigate the PSD correctly and avoid common mistakes.
By being mindful of these details and taking the time to plan your approach, you can maximize the potential of your horizontal greeting card mockup and create a design that truly reflects your vision and message.